
Oil change diagram of Voith retarder
Apr 01, 2019
All Voith retarders must first unscrew the oil filler plug when draining the oil. At this time, the oil filler port acts as a vent hole, which can quickly drain the waste oil. After the oil is drained, tighten the oil drain plug. Slowly add a proper amount of engine oil to the fuel filler port, and tighten the fuel filler plug. If you accidentally add too much oil, you can only repeat the oil drain action and refill (except for 133-2).
115CT:

1. Oiling screw plug
2. Copper pad
3. Copper pad
4. Oil drain screw plug
5.O-ring
Required tools: oiling screw plug - 17mm hexagonal wrench; oil drain screw plug - 21mm hexagonal socket
Refueling volume: 6.4 liters for maintenance oil change; 6.8 liters if the radiator is replaced
115CN:

1.Copper pad
2. Oiling screw plug
3.Oiling screw plug
4.Copper pad

1. O-ring
2. Copper pad
3.Oil drain screw plug
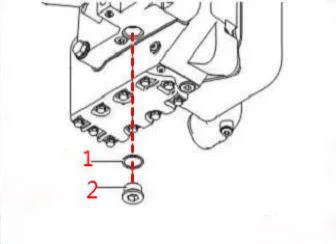
1.Copper pad
2.Pressure control valve screw plug
Required tools: oiling screw plug - 17mm hexagonal wrench; oil draining screw plug - 10mm hexagonal wrench
Pressure control valve plug also needs to be unscrewed, there is a small amount of oil inside
Refueling volume: 5.9 liters for maintenance oil change; 6.6 liters if the radiator is replaced
133-2:

1.Oiling screw plug
2.Copper pad
3.Oil dipstick
4.Copper pad
5.Oil level screw plug
6. Water drain screw plug
7.Oil drain screw plug
8.Copper pad
9.Copper pad
10.Oil and water drain screw plug
Tools required: Oiling screw plug and oil drain screw plug-22mm outer hexagonal socket; dipstick screw plug-12mm inner hexagonal wrench
Oiling capacity: 6 liters for maintenance and oil change; if the radiator is replaced, 7.5-9 liters according to the size of the radiator
Note: The oil-water discharge screw plug should be disassembled and inspected when discharging the oil. Waste water and waste oil will be discharged; if you accidentally add more oil when refueling, you can unscrew the oil level screw plug to release the excess oil.
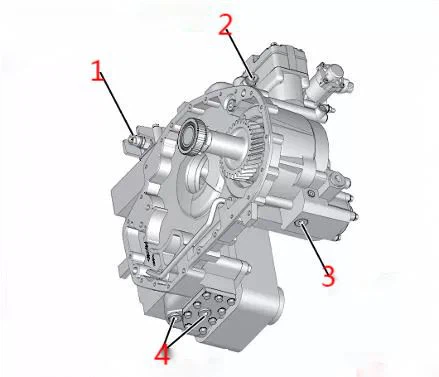
120-E:
1. Oiling screw plug
2. Copper pad
3. Copper pad
4. Drain screw plug
5. Nameplate
Tools required: Oiling screw plug-17mm allen wrench; drain screw plug-10mm allen wrench
Oiling capacity: maintenance and oil change 4 liters; if the radiator is replaced, 5.3 liters
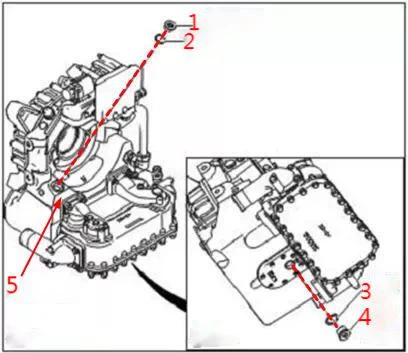
123+:

1.Oiling screw plug
2.Copper pad
3.Copper pad
4.Oil drain screw plug
5.Copper pad
6.Oil drain screw plug
7.Copper pad
8.Oil drain screw plug
1.Water inlet
2.Oil temperature sensor
3.nameplate
4.Water temperature sensor
5. Water outlet
6. Oil drain bolt
7.Water drain bolt
8.Oil drain screw plug
Required tools: oiling screw plug - 17mm hexagonal wrench; oiling screw plug - 12mm and 6mm hexagonal wrench
When draining the oil, you need to unscrew all 3 oil drain plugs to drain the oil.
Oiling quantity: 6 liters for maintenance oil change; 6.5 liters if the radiator is replaced
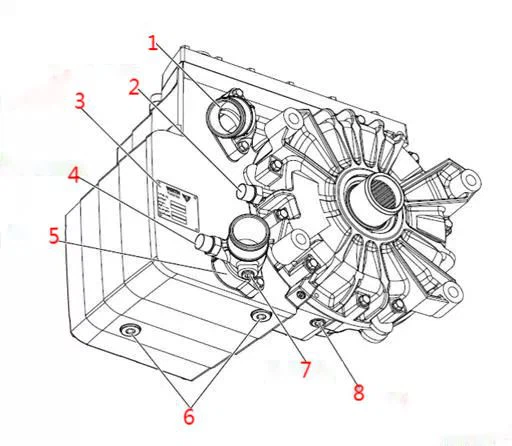
115E:

1. Oiling screw plug
2.Proportional valve
3.Retarder housing
4.nameplate
5.Water temperature sensor
6. Water outlet
7. Radiator
8.Water inlet
1.Pressure sensor
2.Oil temperature sensor
3.Oil drain screw plug
4.Oil drain screw plug (2pcs)
Required tools: oiling screw plug - 17mm hexagonal wrench; oil draining screw plug - 12mm hexagonal wrench
When draining the oil, you need to unscrew all 3 oil drain plugs to drain the oil.
Oil quantity: 6.7-7 liters depending on the type of radiator, maintenance oil change; 7.2-7.5 liters if the radiator is replaced.